

Table of contents
After I set up Godot with C++ the next step in the creative pipeline to make a fancy tree in Godot, is to get some good-looking pixels on my screen. There are several aspects to this. Not only do I need some nice 3D models, but it would be advantageous to have some useful drawing and painting skills. Since I'm really not good at drawing or painting, as you've possibly seen before, that's something I need to work on.
Learning how to draw and paint and 3D-model is a huge endeavour by itself, but I don't expect to be a professional at this. Having a skill level which allows me to create some basic, but not too bad-looking, digital shapes is something I could work with. Of course, there is always room for improvement after that. And hopefully, that progress will be reflected in a tree which becomes fancier evermore.
Draw and Paint with Krita
For drawing and painting, Krita should be a good start. It's a free and open-source tool for the creation and manipulation of virtual images. While it has some similarities to GIMP, it's more focused on digital art than on image manipulation.
Downloading and installing Krita was straightforward as with other programs you can just download and install, so no need to detail that here. After that was done I played around a little. Having some experience with GIMP (and being educated in the technological / science aspect of digital image processing) I felt familiar with Krita pretty fast. Known concepts such as layers, layer modes, a colour picker, and various brushes were all easy to see and rather intuitive to use. The UI is different to GIMP though, but that's not an issue as you can get used to that rather easily. What I already like about Krita a lot is the pop-up menu (right mouse click by default), which allows you to select colours, and various brushes, set some brush properties and rotate the canvas.
What's left to do is to learn how to use this tool effectively. And this includes learning how to draw at all. Since my goal is to do everything digitally, it makes sense to learn directly using a graphic tablet. According to the first few tutorials I went through for learning how to draw, training your eyes, i.e., learning to see like an artist is crucial and the medium on which you draw is less important. I will link the tutorials I use(d) and especially the ones I like later.
Before I get to the graphic tablet, I would like to summarize how I made the first fancy tree sketch.
First Sketch
I created the image in my initial blog post using Krita and my mouse. For the elements in the image, I used several layers and brushes, which I arranged such that some layers overlay others.

You can check it out yourself on my GitHub repository (I haven't set up tags yet so just look for the earliest commits, or just use this commit hash: 87cb040322523b76a9c4bd28c516669bcc9f4be7 .)
While I can't recall specific brush settings, I can tell you which ones I used. If I changed something in their settings, then it's probably just the size and opacity (and choosing black as a colour). Let's break them down:
For the thicker lines which look like dried watercolour drops, I used the Watercolor Texture brush.
The smaller blob-like droplets close to those watercolour drops can be painted using the WaterC Special Drops brush*.*
If you look for example at the background of the lettering in the bottom right corner, you can see slightly larger droplets which more distant from each other and are in front of a slightly darker background sometimes. I made those using the WaterC Special Splats brush.
You can get the water surface near the bottom of the tree using the Stamp Water brush.
With another stamp, namely the Stamp Grass brush, I made the small grassy island on which the tree is standing.
The tree itself took a lot of miserable attempts at trying to draw a leafless tree using my mouse before resorting to a simple trunk with a leaf outline. I did this using the Pencil-6 Quick Shade brush.
Regarding the text, I searched for a couple of hours (I kid you not) for a nice fancy calligraphy font. As I would like to use as many free and open-source resources as possible, I stumbled upon Google Fonts. Most fonts there adhere to the SIL Open Font License or other open-source licenses. There I found the Stalemate font, which I found to look suitable for my first little draft.
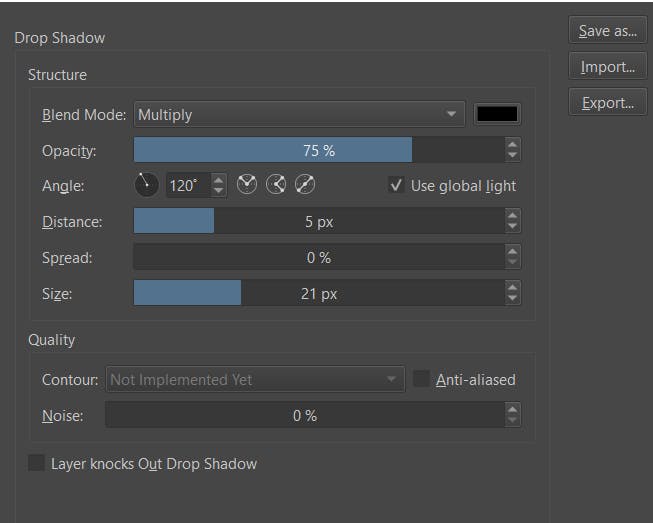
You might notice a shadow in the back of the text. I created this by modifying the layer style of the two vector layers. It's sufficient to toggle "Drop Shadow" on. These are my settings:
That's it. It didn't need much but doesn't look so bad, I think. Despite the tree of course, which is rather simple.
Graphic Tablet
Drawing digitally by just using a mouse is probably very difficult. I don't know whether professionals could do it, but to me, it seems that using a graphic tablet with a pen is the most intuitive choice for drawing digitally. You learn to hold and use a pen since pre-school. It would be interesting whether we could achieve similar results if we were trained to use a mouse instead. ;)
However, this is the first time in this project that I need to invest a little. As I can not get hardware for free, nor is it open source, I need to compromise here. After a little research, I learned that there is a wide range of graphic tablets. From cheap stuff which you can get for less than 100 € up to tens of thousands. Maybe you remember, that I explained in my first blog entry here, that I would like to keep the price reasonably low when I absolutely need to buy something. It shouldn't be trash, but also not provide features and functionality which I don't know how to use and will probably never need.
With that in mind, I continued to read through reviews and took a look at different manufacturers and products. Wacom is a pretty popular player in that market and after comparing several products I knew that it was going to be a graphic tablet by them. My choice boiled down to two different models: the Wacom Intuos and the Wacom Intuos Pro. Regarding the size, medium seems sufficient (spoiler: having the tablet now, I can verify, that medium is enough). Thanks to some comparisons on YouTube, I realized that the only feature that the Pro version offers which I would like to have and which the non-pro version does not have, is gesture control. But is this feature worth 200 bucks more to me? No. Probably not. It would've been nice to have, but the Intuos (not Pro) satisfies most requirements while being at a reasonably low price. I got it for about 130 €.
If you are a student, it's worthwhile to check, whether you can get an education discount when you order the tablet directly from your Wacom store. Check out this link for example https://www.wacom.com/en-us/promos/education-discount.
If you are interested in the comparison videos, here they are:
Installing the driver was as simple as starting the installer. The default settings for the pen have worked fine for me so far (I have tested it for one day as of the time of this writing). But sadly it seems that Krita ignores my pen button settings for the application profile I set via the Wacom driver. I asked for help in Krita's support forum. There were some suggestions for which I am thankful for. But none of them seem to work so far.
My current workaround is to change the Canvas Input settings such that it matches my preferences. I wanted to use "Tumble" (panning the screen) on my upper pen button and the right-click for the pop-up menu action on my lower pen button. Since those pen buttons are interpreted like mouse buttons I remapped the shortcuts to the right- and middle-mouse buttons respectively.
After one evening of using the tablet, I already encountered scratch marks, and that despite having the pen sensitivity on default. However, according to user experience reports I found regarding this issue, this shouldn't become a problem and doesn't reduce the graphic tablet's functionality. Although that's only true as long as it doesn't get worse than some scratches. Considering, that a lot of people have used their graphic tablet for several years, there's hope that my tablet is robust.
Learn to Draw
Now I need to learn how to draw. I started by searching for YouTube tutorials for that and already found something worth watching. Especially, I started to follow the free drawing class by Michael Markowsky:
He has a great and relaxed way of teaching and succeeds in giving me hope that even I can learn how to draw. :)
Before I found that one, I took a look into some other intro videos by other people. Here they two, which might be worth watching for you as well:
If I find more, that I can recommend, I will include them in a future blog post. Since I am just starting out, feel free to give me further suggestions. :)
That's it for this post. Next time I will possibly make a very short post on why I chose Hashnode as a blog platform or maybe I will have made something with Blender by then about which I could talk. Or it will be about something different, like the roadmap for this project (which I have still to make) or even some first few scenes in Godot. We'll see. ;)
Until then!
– Zacryon